

WordPress allows developers to create custom plugins that can add functionality to your website. One of the common uses for plugins is inserting custom content (like a header or footer) on your website. In this tutorial, I will guide you through creating a WordPress plugin that inserts custom content in the header and footer sections using the options table in the WordPress database.
Prerequisites
Before starting, you should have a basic understanding of how WordPress plugins work and how to interact with the WordPress database. You should also have access to your WordPress site’s file structure, as you’ll need to create plugin files and edit the database.
Creating the Plugin
First, create a folder in the wp-content/plugins directory. Let’s name our plugin easy-header-footer. Create a folder and name it easy-header-footer. Next, create a PHP file inside the folder and name it easy-header-footer.php.
wp-content/plugins/easy-header-footer/easy-header-footer.php
Inside the easy-header-footer folder, create a PHP file and name it uninstall.php. Next, create a new folder and name it includes.
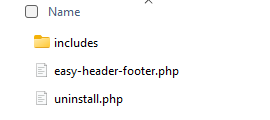
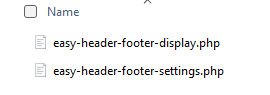
Inside the includes folder, we are going to create two PHP files that will handle all the code for our plugin.
Create two separate PHP files: easy-header-footer-display.php and easy-header-footer-settings.php,
Open the easy-header-footer.php file in a text editor. I will be using Visual Studio Code.
Here’s the basic structure of your plugin file:
<?php
/**
* Easy Header Footer
*
* Plugin Name: Easy Header Footer
* Plugin URI: https://www.wpherocoder.com
* Description: Inject custom code into the header or footer globally.
* Version: 1.0.0
* Author: Jasen Haslacker
* Author URI: https://www.wpherocoder.com
* License: GPLv2 or Later
* License URI: https://www.gnu.org/licenses/gpl-3.0.en.html
*/
// do not allow direct access
if(!defined(‘ABSPATH’)){
exit;
}
//include files from the includes folder
include(plugin_dir_path(__FILE__) . ‘includes/easy-header-footer-settings.php’);
include(plugin_dir_path(__FILE__) . ‘includes/easy-header-footer-display.php’);
Explanation:
We created the plugin header comments, so WordPress understands that the file is a plugin.
The plugin name field is required by WordPress.
Next, we created the ABSPATH so unwanted visitors will not be able to access the file directly.
Last, we are including the direct path to our files that we created inside the includes folder.
Useful Tip: When creating WordPress plugins, a good practice is to change the WP_DEBUG from False to True inside the wp-config.php file.
**** Before you go live with your plugin make sure to change the WP_DEBUG back to False from True. ****
define( ‘WP_DEBUG’, true );
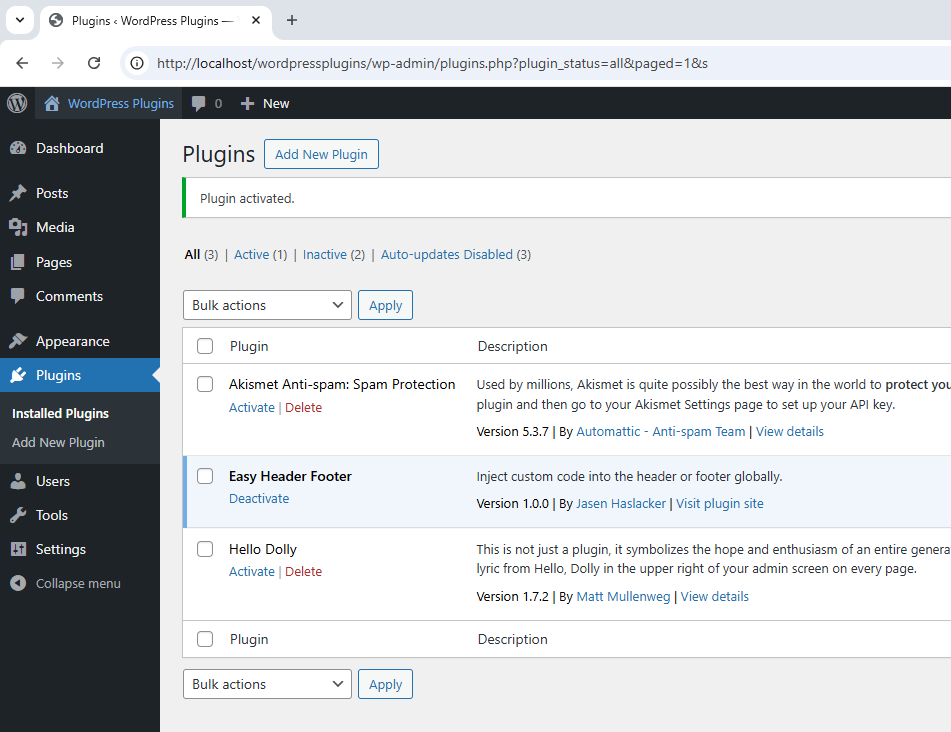
If you activate the plugin you will see the message – Plugin activated.
Adding Plugin Files
Now that we have the basic plugin file, let’s focus on adding functionality to insert content into the header and footer.
Creating the Plugin Settings Page
In this section we are going to create the admin menu.
To allow users to input custom content, we’ll create a settings page in the WordPress admin panel where the user can enter the content for the header and footer.
Add the following code to the plugin file to create the settings page: /includes/easy-header-footer-settings.php
<?php
/**
* Easy Header Footer Settings
*/
// do not allow direct access
if(!defined(‘ABSPATH’)){
exit;
}
// setting up the admin menu
function EZ_EasyHeaderFooter_add_admin_menu(){
add_menu_page(
‘Easy Header Footer Settings’, // The text to be displayed in the title tags of the page when the menu is selected.
‘EZ Header Footer’, // The text to be used for the menu.
‘manage_options’, // The capability required for this menu to be displayed to the user.
‘easy-header-footer-settings’, // The slug name to refer to this menu by.
‘EZ_EasyHeaderFooter_settings_page’, // The function to be called to output the content for this page.
‘dashicons-code-standards’ // The name of the icon that is to be used.
);
}
add_action(‘admin_menu’, ‘EZ_EasyHeaderFooter_add_admin_menu’);
Explanation:
We created the Admin Menu settings; this is what will be displayed in the admin menu area.
We are using the add_menu_page function and loading the parameters.
‘Easy Header Footer Settings’ – The text to be displayed in the title tags of the page when the menu is selected.
‘EZ Header Footer’ – The text to be used for the menu.
‘manage_options’ – The capability required for this menu to be displayed to the user.
‘easy-header-footer-settings’ – The slug name to refer to this menu by.
‘EZ_EasyHeaderFooter_settings_page’ – The function to be called to output the content for this page.
‘dashicons-code-standards’ – The name of the icon that is to be used.
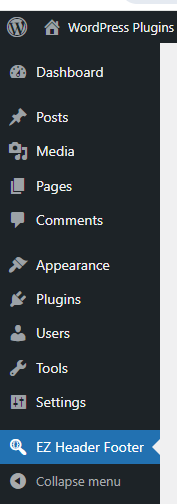
Either refresh the WordPress website or activate the plugin if it was deactivated.
You will see the EZ Header Footer in the admin menu along with the dashicon code standards.
You may choose any dashicon that you want to use.
If you visit the wordpress.org website for dashicons. You will see the complete list of each one.
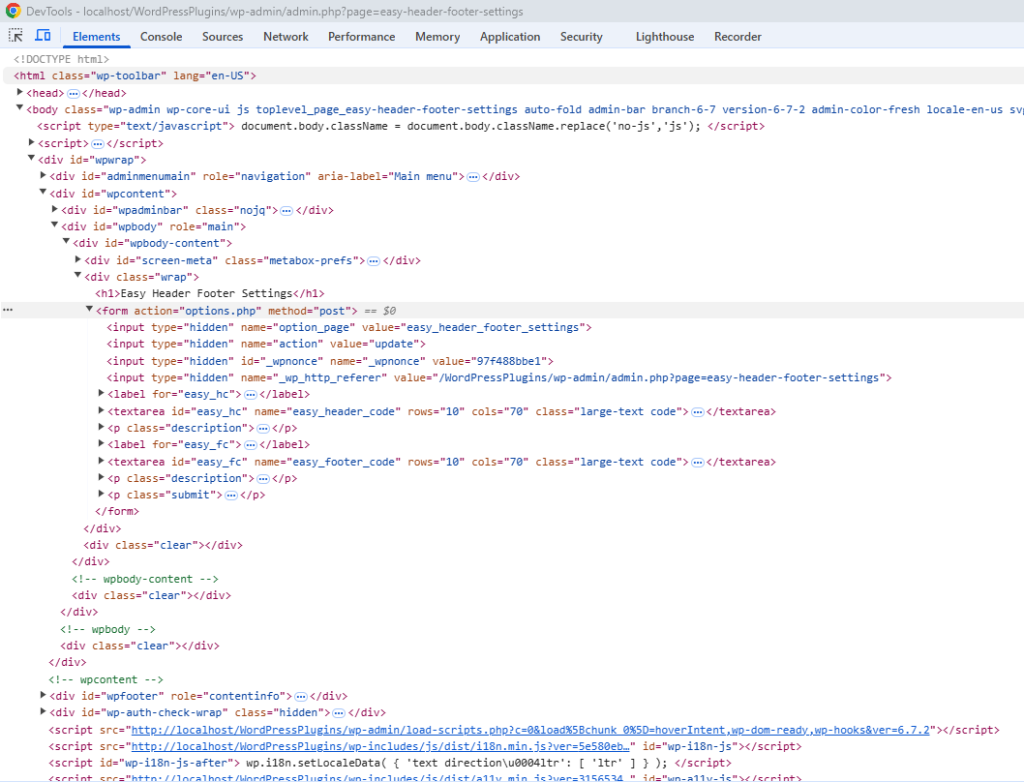
easy-header-footer-settings, the slug name to refer to this menu.

Continuing
Add the following code to the plugin file to create the settings page: /includes/easy-header-footer-settings.php
// clean the data before going into db
function EZ_EasyHeaderFooter_settings_init(){
register_setting(‘easy_header_footer_settings’, ‘easy_header_code’, [‘sanitize_callback’ => ‘ez_easy_sanitize_code’]);
register_setting(‘easy_header_footer_settings’, ‘easy_footer_code’, [‘sanitize_callback’ => ‘ez_easy_sanitize_code’]);
}
add_action(‘admin_init’, ‘EZ_EasyHeaderFooter_settings_init’);
Explanation:
In the settings page we have created two option fields.
The easy_header_code and easy_footer_code will store data in the database.
We registered those options fields with the add_action function.
We used the admin_init hook, and a call back function named EZ_EasyHeaderFooter_settings_init.
We are telling WordPress to run our EZ_EasyHeaderFooter_settings_init function during the admin_init action.
The admin_init action hook fires when the admin dashboard initializes making it the perfect place to register our settings.
Inside the call back function, we will register the header code settings and the footer code settings.
We are using the register settings function that uses option groups and option name, along with arguments.
Register Setting for Header and Footer:
‘easy_header_footer_settings’ – the settings group name, think of it as a category which we are grouping related settings.
‘easy_header_code’ – the name of our individual settings, it is where we will store the custom code for the header.
‘easy_footer_code’ – the name of our individual settings, it is where we will store the custom code for the footer.
‘ez_easy_sanitize_code’ – we are specifying a function to clean the input before it is saved into the database.
We will write the ‘ez_easy_sanitize_code’ function coming up soon.
We have created these two options or settings, the easy_header_code and easy_footer_code, that will be stored in the database.
We can retrieve the data by using easy_header_code and easy_footer_code.
Continuing
Add the following code to the plugin file to create the settings page: /includes/easy-header-footer-settings.php
// setting up the layout for the admin settings page
function EZ_EasyHeaderFooter_settings_page(){
?>
<div class=”wrap”>
<h1>Easy Header Footer Settings</h1>
<form action=”options.php” method=”post”>
<?php
// the settings_fields is using the name out of register_setting above
settings_fields(‘easy_header_footer_settings’);
do_settings_sections(‘easy_header_footer_settings’);
?>
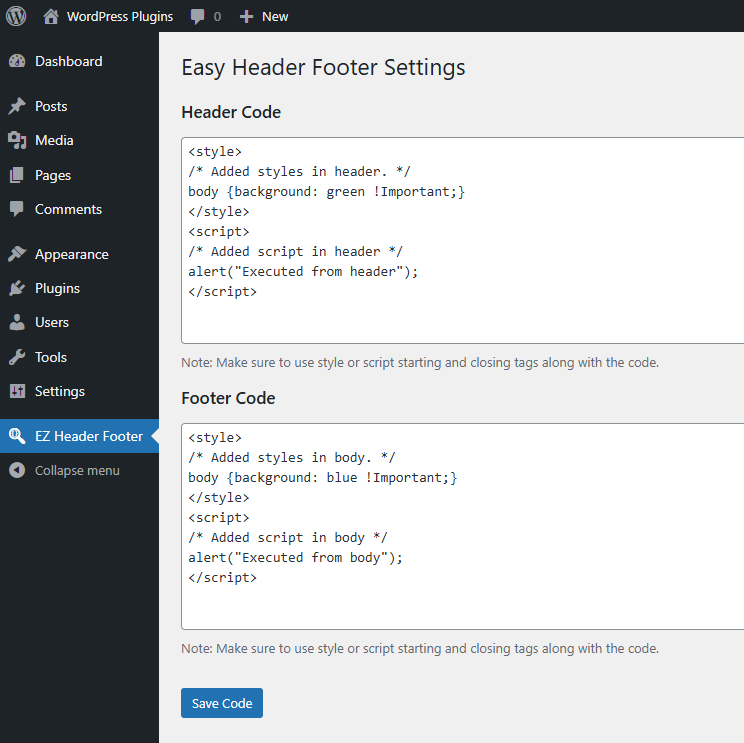
<label for=”easy_hc”><h2>Header Code</h2></label>
<textarea id=”easy_hc” name=”easy_header_code” rows=”10″ cols=”70″ class=”large-text code”><?php echo esc_textarea(get_option(‘easy_header_code’)); ?></textarea>
<p class=”description”>
Note: Make sure to use style or script starting and closing tags along with the code.
</p>
<label for=”easy_fc”><h2>Footer Code</h2></label>
<textarea id=”easy_fc” name=”easy_footer_code” rows=”10″ cols=”70″ class=”large-text code”><?php echo esc_textarea(get_option(‘easy_footer_code’)); ?></textarea>
<p class=”description”>
Note: Make sure to use style or script starting and closing tags along with the code.
</p>
<?php submit_button(‘Save Code’, ‘primary’); ?>
</form>
</div>
<?php
}
Explanation:
The callback function is to display the plugin settings page content.
The EZ_EasyHeaderFooter_settings_page is referenced in the add_menu_page above in the Admin Menu settings.
We end the PHP tag “?>” and then start adding the HTML, the div class wrap is provided by WordPress.
The <h1> tag is our Title in the settings page.
The HTML form element uses the WordPress core options.php file.
We use two functions, the settings_fields and do_settings_sections.
The functions output hidden security fields required by WordPress to process and save the settings inside the database.
It generates hidden input fields that include the security nonce and the settings page information.
The easy_header_footer_settings is the settings group name we used when registering settings with the register settings function.

The hidden fields that WordPress creates:
In our label we are using the for= and assigning the id= to it from our textarea html element.
What this will achieve is when a visitor clicks or tabs on the label for Header Code or Footer Code it will set the focus on the textarea element.
The textarea name must be the same as what was registered in the setting in the register_setting function.

The class name “large-text code” is a built in CSS class within WordPress and we can use it.
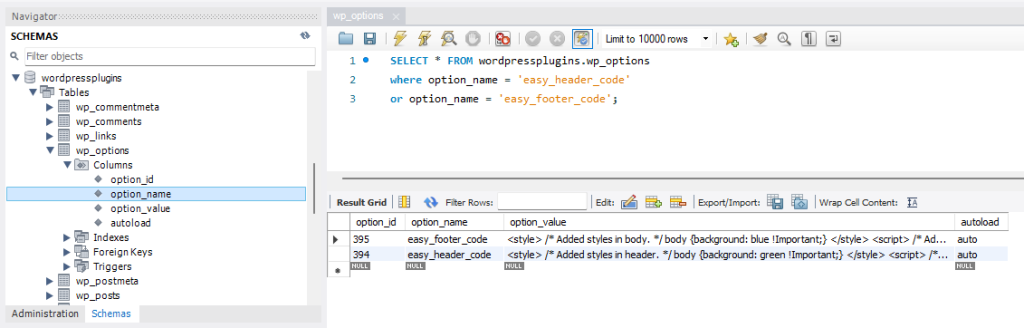
We are echoing out the values ‘easy_header_code’ and ‘easy_footer_code’ from the options table within the database.
The get_option function will retrieve the saved value load of the specific option from the WordPress options table within the database. i.e it retrieves the option_value from the database where it matches option_name.
The esc_textarea is used for escaping the textarea values.
We created a paragraph element, and the class description is a CSS class within WordPress.
We created a Save Code button by using the submit button function.
When the form is submitted the data entered in the textarea elements for both easy_header_code and easy_footer_code, the data will then be stored in the options table within the database.
Continuing
Add the following code to the plugin file to create the settings page: /includes/easy-header-footer-settings.php
// sanitize data
function ez_easy_sanitize_code($code){
$allowed_html = array(
‘script’ => array(),
‘style’ => array()
);
return wp_kses($code, $allowed_html);
}
Explanation:
The ez_easy_sanitize_code($code) function.
The $allowed_html parameter for script and style will return the wp_kses function values.
The wp_kses function is a WordPress function to allow specific types of HTML tags and attributes.
We have defined ‘script’ and ‘style’ or JavaScript and CSS Styles.
The function will take a single parameter code and sanitize the visitors’ input and save it to the database.
We now have data saved in the database.
Creating the Plugin Display Page
We are going to code the page to have the functionality work when visitors use the website.
The code below is what will allow the style and scripts to work on the front end of the website.
Add the following code to the plugin file to create the display page: /includes/easy-header-footer-display.php
<?php
/**
* Easy Header Footer Display
*/
// do not allow direct access
if(!defined(‘ABSPATH’)){
exit;
}
// header code
function EZ_EasyHeaderFooter_inject_header_code() {
$header_code = get_option(‘easy_header_code’);
if(!empty($header_code)){
$header_code = trim($header_code);
echo $header_code;
}
}
add_action(‘wp_head’, ‘EZ_EasyHeaderFooter_inject_header_code’);
// footer code
function EZ_EasyHeaderFooter_inject_footer_code() {
$footer_code = get_option(‘easy_footer_code’);
if(!empty($footer_code)){
$footer_code = trim($footer_code);
echo $footer_code;
}
}
add_action(‘wp_footer’, ‘EZ_EasyHeaderFooter_inject_footer_code’);
Explanation:
We added code the page to have the functionality work when visitors use the website.
We must retrieve the data and display it on the front end.
We created two different functions to output data from the database to the header and footer of the page.
Then we use a condition to display a message when data has been saved in the database.
The callback function and get the data that is stored in the database.
We created two variables named $header_code and $footer_code.
We then assigned get_option(‘easy_header_code’) and get_option(‘easy_footer_code’) to the $header_code and $footer_code assigned variables.
The get_option function is what retrieves the data that is stored in the database for ‘easy_header_code’ and ‘easy_footer_code’, which is the option_name in database.
Then we need to check if there is any $header_code and $footer_code to output. If the condition is true, then display the value with the echo to output the stored values.
Continuing
Add the following code to the plugin file to create the display page: /includes/easy-header-footer-display.php
Explanation:
We created a variable $easyhfs and assigned the name ‘easy-header-footer-settings’ to the variable.
We created another variable $easyhfsinsert and assigned it to empty.
We created a condition and use isset to check get ‘page’ and get ‘settings-updated’.
Next, we assigned the $_GET[‘page’] to the $easyhfsinsert variable.
Then we created a condition to check if both variables equal ‘easy-header-footer-settings’ slug.
If the condition is true, we echo out the saved message in an html element.
Creating the Uninstall Page
When you no longer want the plugin, you will want to uninstall the plugin.
Being a responsible plugin developer, you should never leave orphan data stored in a database.
Always remove any orphan data from the database.
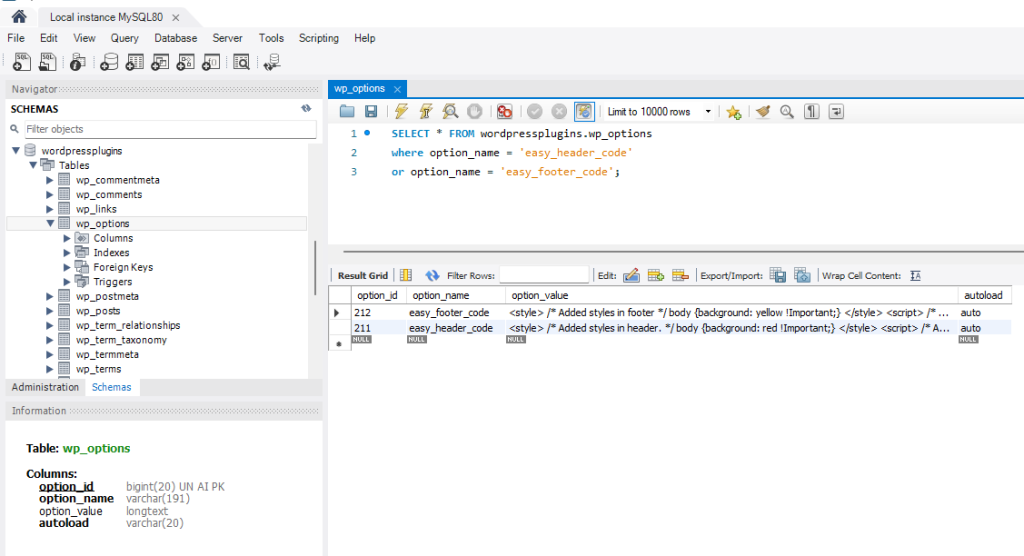
In the database we have stored data in the options table both easy_header_code and easy_footer_code.
/**
* Uninstall Easy Header Footer
*/
// Exit if accessed directly.
if ( ! defined( ‘WP_UNINSTALL_PLUGIN’ ) ) exit;
global $wpdb;
// /** Delete all the Plugin Options */
$wpdb->query( “DELETE FROM $wpdb->options WHERE option_name = ‘easy_header_code'” );
$wpdb->query( “DELETE FROM $wpdb->options WHERE option_name = ‘easy_footer_code'” );
Explanation:
We created a condition to check if accessed directly and exited if accessed directly.
The global $wpdb is an object that is used to read data from any table in the WordPress database.
The $wpdb->query performs a database query, using current database connection.
The SQL statement is going to delete from the options table in the WordPress database, where option_name equal to ‘easy_header_code’.
The SQL statement is going to delete from the options table in the WordPress database, where option_name equal to ‘easy_footer_code’.
Make sure that you make a copy of the plugin before you click delete because everything will be removed.
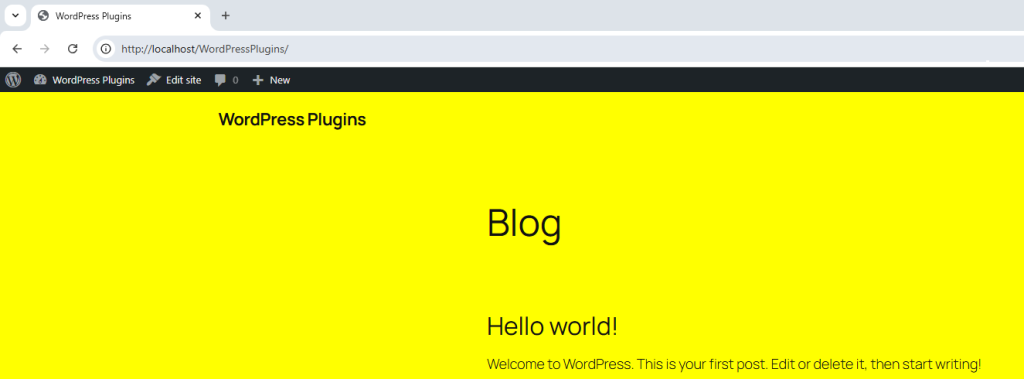
Viewing the Plugin in Action
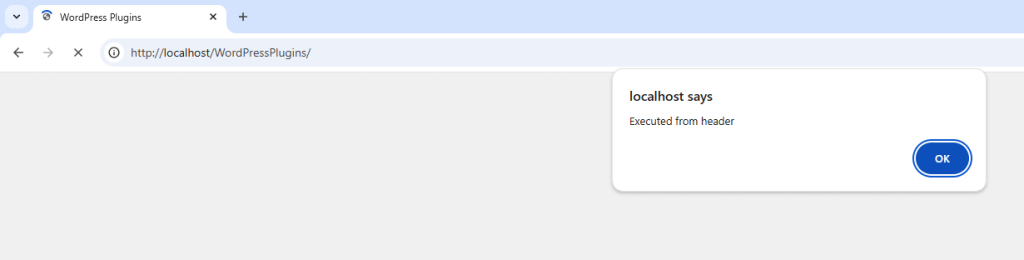
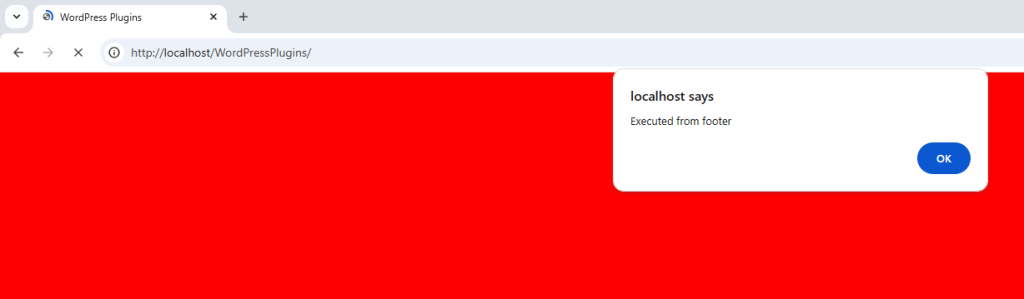
Let’s look and see our plugin in action.
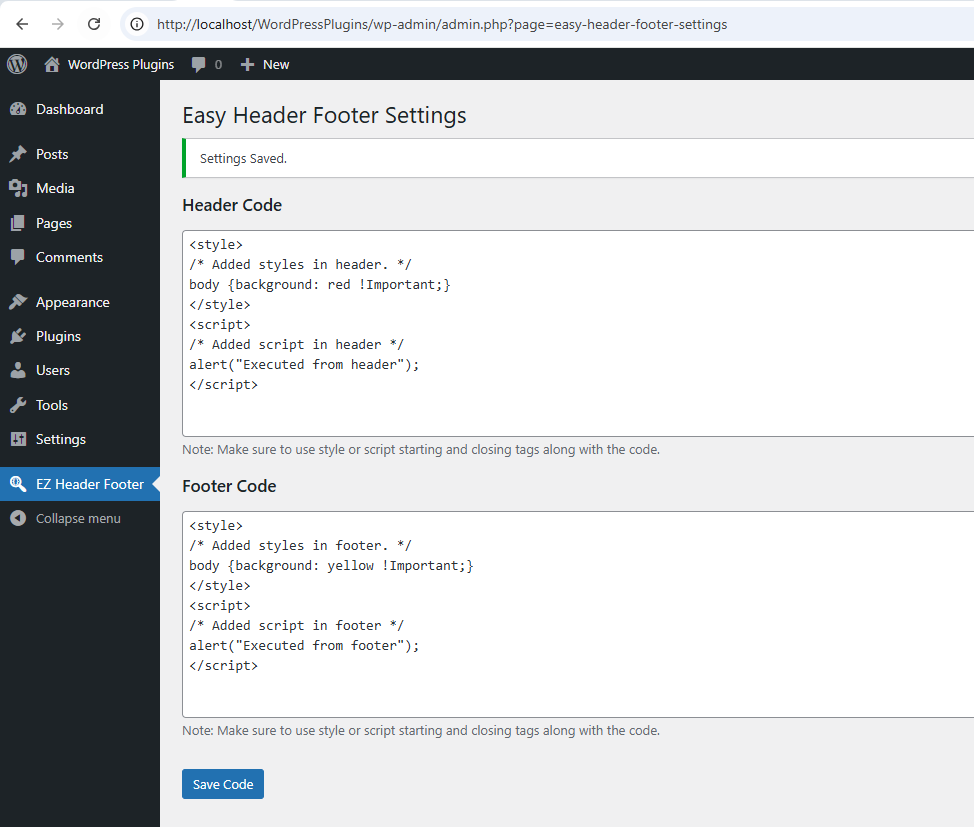
We changed the header code area for the body background from green to red and saved the value into the database.
When you open the WordPress website here is what you will see.
The message box shows Executed from header, which is called from Header Code.
The message box shows Executed from footer, which is called from Footer Code.
The website background will end up being yellow, because the footer is last to load.
Conclusion
In this tutorial, we created a WordPress plugin that allows users to insert custom header and footer content across the entire website.
This was achieved by creating a settings page in the admin area, using the options table to save and retrieve content, and using WordPress hooks (wp_head and wp_footer) to insert the content into the appropriate sections of the website.
This approach offers a flexible way to inject custom content into your site without having to manually edit Theme files.
It’s also extendable — you can add more fields or customization options based on your needs.
Download the project.